
These gluten-free biscuits are soft, fluffy, and buttery!
Biscuits are a great way to start the weekend, perhaps with eggs, fruit, and coffee. I have completely reworked my old biscuit recipe, as I've learned much more about gluten-free baking since I developed it. After much testing, this is the best gluten-free biscuit recipe yet!

Jump to:
Funny story: I come from Canada where we call these tea biscuits. I had lived in the United States for almost a year before I realized that they're just called biscuits here! No wonder my husband couldn't find any tea biscuits with raisins in the stores!
Why This Recipe Works
These gluten-free biscuits are as easy to whip up as the regular wheat-flour variety if you have a batch of Cathy's Gluten Free All-Purpose Flour Blend on hand. It's a great mix for many other recipes on this website like Gluten-Free Lemon Cake and Herb Flavored Gluten-Free Drop Biscuits. Save money by making the flour blend yourself. It's much more convenient to use it rather than measuring out numerous flours each time you bake.
Gather Your Ingredients

- Cathy's Gluten Free All-Purpose Flour Blend - If you don't want to mix this yourself, Better Batter Original Blend is probably the closest substitute. Various gluten-free flour mixes have vastly differing ingredients, so results cannot be guaranteed.
- Butter - There's lots of butter in these biscuits, and it gives them a wonderful flavor and soft texture.
- Yogurt - I've tested this recipe with both heavy Greek-style full-fat yogurt and full-fat sour cream with equally great results.
- Raw Sugar - I like to use small amounts of raw cane sugar, because it is less processed than white or brown sugars.
- Egg - While biscuits don't typically contain eggs, this gluten-free recipe is better with one egg.
For the exact amounts and detailed recipe instructions, scroll down to the end of this post, or click the Jump to Recipe button at the top.
Here is the difference a gluten-free flour blend can make. These two batches were made exactly the same way, at exactly the same time, and baked together. The only difference between them was the gluten-free flour blend that I used! The ones on the left were VERY crumbly. The ones on the right used my all-purpose flour blend and developed into this biscuit recipe.

Step-by-Step Instructions

1. Combine
flour, sugar, baking powder, baking soda, and salt. Then pulse the food processor a few more times to distribute the butter.

2. Whisk
the egg into the yogurt or sour cream. Run the machine slowly as you pour in this liquid mixture.

3. Mix
Stop the food processor as soon as the dough balls up into a sticky ball. Allow it to sit for 30 minutes.
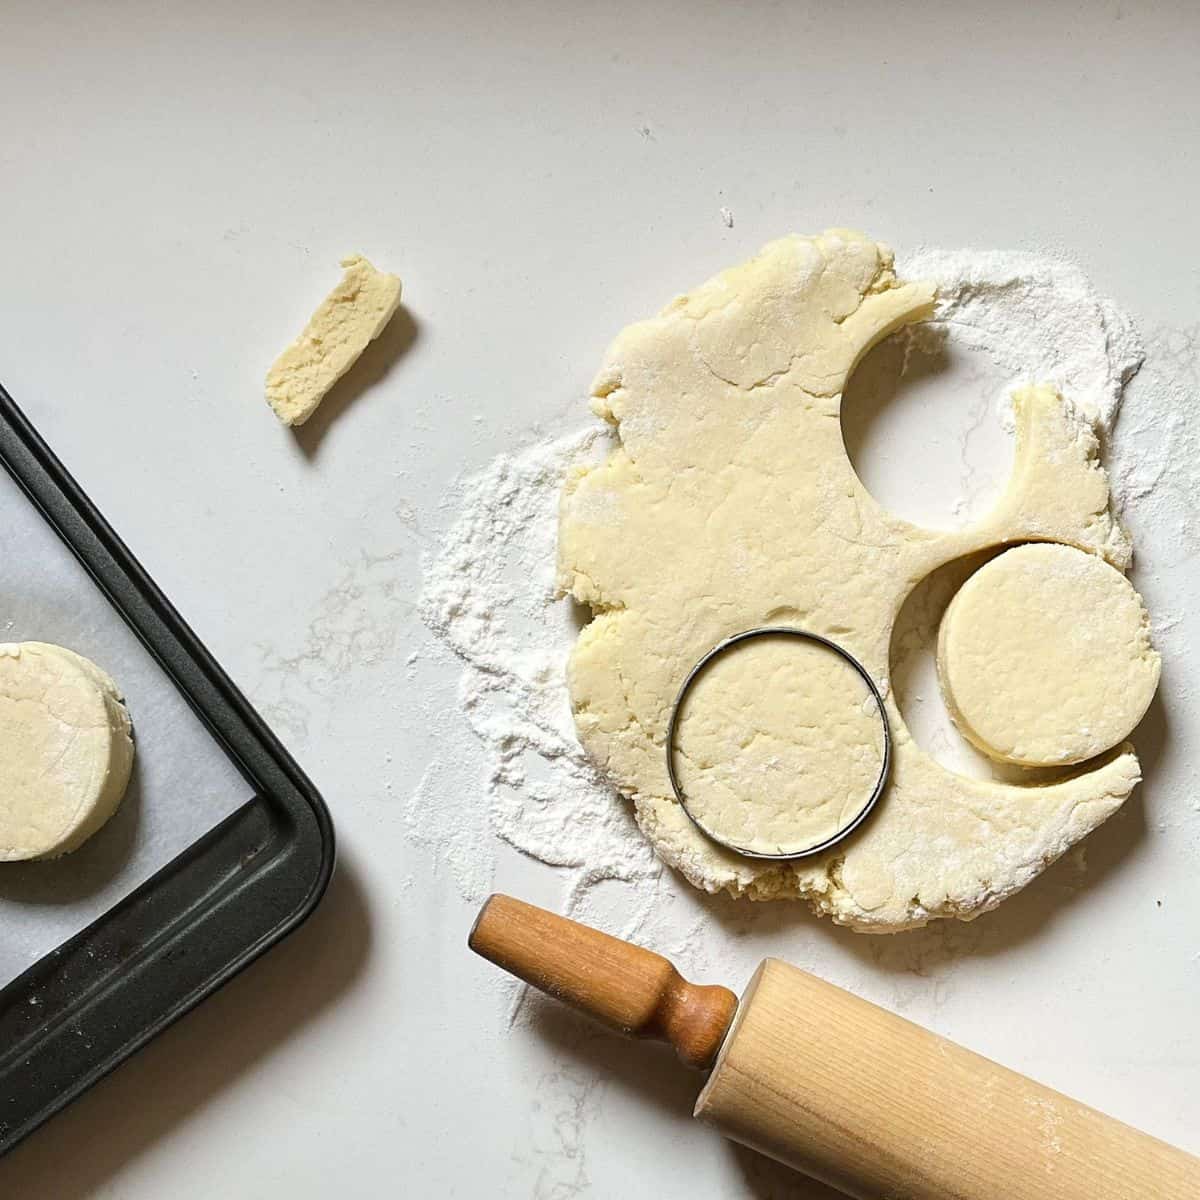
4. Roll and cut.
Roll out the dough on a floured surface, cut the biscuits, place them on a parchment-lined sheet, and bake.

5. Bake
Start the biscuits in a very hot oven to get a good "spring" (rising). Then turn the heat down right away so they don't burn.
No Food Processor?
You can make gf biscuits without a food processor. It's just a little more work.
Whisk the dry ingredients together in one bowl and the egg and yogurt in another. Cut the butter into the dry mixture with a pastry blender. Then, stir in the egg-yogurt mixture with a big spoon until the batter comes together in a moist ball.
You might need to use your hands. This method will take a little extra muscle power, but you can do it!

Recipe Notes
I started over from scratch with this new recipe. As I've been baking gluten-free for more than ten years now, I knew I could do much better than the first biscuit recipe I published here. Fortunately for all of us, gluten-free baking has come a long way!
At first, I tried using the flour combination that was in my original recipe, but then realized that, while the taste was good, my all-purpose blend would provide a texture more like the traditional biscuits to which we've become accustomed.
I did try another flour mix in one batch, but the results were not nearly as good. What a difference the flour makes!
I tried making smaller, taller biscuits, but there didn't seem to be any benefit to doing that.
I used both my thick, homemade yogurt and full-fat sour cream. There didn't seem to be any difference between those batches. I did, however, use slightly less in one batch, because I had run out. Those biscuits were much too dry, so careful measuring is important!
Expert Tips
- Measure carefully.
- Keep dairy ingredients chilled.
- Allow the dough to rest for 30 minutes, but not longer.
- After the oven has fully preheated, place the biscuits inside, close the door, and only then turn the heat down.
Serving Tips
Biscuits are best served warm and fresh. Top them as you wish. Strawberry Chia Jam, raw honey, or nut butters are good choices for toppings. Of course, they're also great plain or buttered with soft, runny eggs!
Storage Tips
Once the biscuits have cooled completely, store them at room temperature in an airtight container for a day or two. If you're keeping them any longer, refrigerate or freeze them. After the first day, toast the biscuits to warm them up for serving.
Freezer Instructions
These gluten-free biscuits freeze very well, sealed in an airtight container. Since they're best toasted for serving if they've been frozen, you might want to go ahead and slice them in half before you freeze them.
Variations
In Canada, biscuits often have raisins in them, and we call them tea biscuits. If you would like tea biscuits with raisins, add about two tablespoons of sultana raisins just before rolling out the dough.
Recipe FAQ's
Actually, there are a few! You need to use a combination of different flours, not just one kind. You need a binder, such as xanthan gum or psyllium husk, to hold dough together in the absence of gluten. Expect gluten-free batter to be moister than conventional wheat dough. And finally, a 30-minute rest before baking allows moisture to be absorbed for better results.
There are a couple of reasons why your tea biscuits might not rise. Perhaps there is not enough liquid in the batter. Gluten-free batters usually need to be moister than wheat ones.
Or, it might be that you're not using enough baking powder. Gluten-free baking generally requires more rising agent than other recipes do. I recommend following a recipe that has been specifically developed to be gluten-free rather than using a regular recipe and just replacing the wheat flour with a gluten-free blend.
Butter should be chilled for cutting in. Slice the butter into large chunks. Then, use a pastry blender to cut through it into the flour mixture repeatedly until the butter is about the size of peas, coated in flour.

Gluten Free Drop Biscuits
If you'd rather not roll and cut, try Gluten-Free Drop Biscuits.
Recipe

GF Biscuit Recipe
Equipment
- 1 food processor optional
- Parchment paper optional
Ingredients
- 1⅔ cup Cathy's Gluten Free All Purpose Flour Blend
- 1 tablespoon raw sugar
- 1 tablespoon baking powder
- 1 teaspoon baking soda
- ¼ teaspoon fine sea salt
- 6 tablespoon cold butter
- ⅔ cup Greek yogurt or full-fat sour cream
- 1 large egg
Instructions
- Combine the flour, sugar, baking powder, baking soda, and salt in a food processor.
- Drop the butter into the flour mixture in a few chunks. Pulse the food processor a few times to chop it up and disperse it evenly in small pieces, but don't run the machine much at this point.
- Whisk together the egg and yogurt.
- With the food processor running on low speed, pour the yogurt-egg mixture in. Stop when the dough forms a ball.
- Allow the dough to sit for 30 minutes to absorb the moisture.
- Preheat the oven to 500℉ (260℃). Line a baking sheet with parchment paper. Place a second baking sheet beneath it to double the sheets and keep your biscuits from burning on the bottom.
- Roll out the dough on a floured surface until it's about ¾-inch (2 cm) thick. (I use plain white rice flour for this, rather than using up my all-purpose blend.) Cut biscuits into round shapes about 2-inches (5 cm) in diameter and place on the prepared pan.
- Place the pan on the middle rack of the preheated oven, close the door, and then turn the heat down to 425℉ (218℃). Bake the biscuits for about 14 minutes, but keep an eye on them. Ovens vary. They should brown nicely on the top.
- Remove the pan from the oven and place it on a cooling rack for a few minutes before enjoying your fresh, hot biscuits!
Notes
- If you don't have a food processor, whisk the dry ingredients together by hand, cut in the butter, and stir the liquid mixture in well until the dough forms a ball. You may need to work it with your hands.
- The 30 minutes of resting is a trick we have discovered for gluten-free baking to turn out better.
- Don't lower the oven temperature until you have put the biscuits in to bake AND have closed the door. Otherwise, they won't get the blast of heat required for optimal rising.
Cathy Brak says
I've made these many times, and we just love them!
Tabitha Stevens says
YUM! I used to adore tea biscuits! A local diner i worked at used to have the best tea biscuits and I sadly had to give them up when I went gluten free. Can't wait to try yours! Perhaps they will taste just as good. Thanks for your recipes.
Cathy says
Thank you for reaching out to me, Tabitha. I hope you love the tea biscuits as much as we do!
Elizabeth says
Thanks to you and your nutritional delicious recipes I’m enjoying being gluten and dairy free.
Cathy says
I'm so happy to read this! Do let me know what new recipes you would like to see.
Kiki Johnson says
What a great, easy recipe! I have never baked with arrowroot flour, but your biscuits look so delicious that I think I should try! I love the crinkled look of them!
Cathy says
I hope you enjoy the biscuits, too!
Leslie says
Yum! I love those mornings where you have time to linger over breakfast. These look great, Cathy!
Cathy says
Thanks, Leslie! Yes, those leisurely mornings are too few and far between.
Sean@Diversivore says
I continue to be impressed by your gluten-free creations! I've worked with a fair number of different flour types over the years but I've not tried arrowroot yet. It's always been an ingredient of interest to me though. Do you find that it has a fairly neutral flavour, or does it contribute any character of its own to the recipe? Regardless, they look like a wonderful tea-time treat to me!
Cathy says
I find that arrowroot flour has a neutral flavour. That's one of the reasons I like it. These biscuits definitely play a supporting role to whatever you'd like to put on them. Thanks for stopping by, Sean!
Elaine @ Flavour and Savour says
These look delicious! I'll bet they'd be good with herbs, too, if I eliminate the sugar and make them a savoury biscuit. Must try! Pinning.
Cathy says
I think they would be great with herbs! We can make all sorts of variations!